Self-publishing took a turn for the better almost a decade ago.
Digital printing presses enabled shorter than short print runs – you could now print and order a single copy of your own book for little more than the price of a paperback in Waterstones.*
The first of these new innovators were Lulu, which came to life in 2004. Two years later Blurb emerged. In my experience these two have been by far the cheapest self-publishers, Lulu giving greater versatility, Blurb slightly better quality (certainly in these early days).
I first used the services of both in 2007. From experience I can tell you that converting files to pdfs for printing was not an easy process. In some ways it still is not but the process has improved.
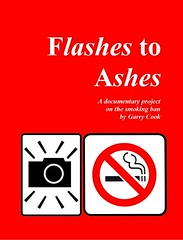
My first and soon to be re-published book, Flashes to Ashes, was designed on Microsoft Publisher (a program never used again) and led to many hours of headaches before I finally cracked the pdf-making process. This included a couple of frantic nights were the converted pdf size was out-putting at 150gb when 150gb hard-drives were like gold dust.
I have to say the quality of printing and cut for full-bleed Lulu books was hugely variable in those days. I was not impressed on numerous occasions and had to have orders reprinted on several occassions.
But soon the printed self-published photo book will be superceded by the digital ephotobook – once the ability to produce digital editions is cracked.
And here we come to the big problem: photo books do not convert digitally anywhere near as easily as novels. The iPad, iPhone, Kindle and eReaders are crying out for photo books.
It was at the beginning of 2010 that Amazon’s digital book sales outstripped its paper versions for the first time. But photo books are conspicuous by their absence in the digital world.
Getting a photo book out there as a digital ephoto book for iPad’s iBook, Kindle (which has a colour Kindle Fire on its way) and Barnes & Noble’s absurdly-named NOOK is, to use my best English accent, a bloody nightmare darling.
So here is my what you can and can’t do digitally with photo books now (November 2011)
Blurb (since October 2011) allow you to produce epub photo books for the iPad and iPhone. This can be done ONLY through their Bookify or BookSmart software
As yet, Blurb can’t convert a pdf into an epub book.
And Blurb do NOT have the facility to sell the book for you on iTunes (although there are plans for this).
When they sort out these two issues, they will be THE place to convert photobooks.
LULU
Lulu are one of several official aggregators for iTunes, meaning you can convert an epub book with them and sell it on iTunes – but this service is not designed for photobooks. Books must be converted from Microsoft Word. Pdfs do not convert.
Other iTunes aggregators are: Ingram, inscribe Digital, LibreDigital and Smashwords. Bookwire is the only Europe-based official aggregator but those of us based in Europe do not have to use them. Which is a good job as their website is written in German.
Lulu supply an ISBN number
DO IT YOUR SELF
You can create your own iPad book but it’s very complicated. And if you don’t have a MAC you can’t create the epub file or (if you don’t have an iPad) test it properly.
There is a great guide here from Blurb.
You must buy and supply your own ISBN number.
CREATESPACE
Amazon’s own self-publishing house allows you to sell directly to their website (the world’s greatest book seller) and around the world through it’s Expanded Distribution Channel.
Their book sizes are really designed for novels only. This means no real choice of paper and they don’t have many book sizes to chose from. If you opt for one of non-industry standard sizes, these books can’t be sold around the world in their Expanded Distribution Channel.
And as an aside, the profit margins for hard copy books sold through their EDC is poor.
CreateSpace supply an ISBN number.
LIGHTNING SOURCE
Perhaps the most non-user friendly application process which involves printing out several pdfs signing them and posting them to the office closest to you (yes, there is one in the UK). Yes, sending applications in the post does still happen. On the plus side, you do get friendly emails sent by real people.
You must buy and supply your own ISBN number.
iTUNES CONNECT
You can submit your own books to iTunes Connect BUT you must pass a stupendous application process.
Just for starters you must have an American IRS tax number. iTunes support and advice in how to do this is appalling.
If you are not resident in the US this means sending a form (I think it’s a W-7 but their website and iTunes own advice is contradictory in places) by post. This process takes two months and includes getting copies of your ID (i.e. passport) signed by US notified officials. You may have to visit your local US Embassy to do this.
You cannot email the IRS or your US Embassy.
Once you’ve got your IRS number you submit to iTunes Connect. Success is at their discretion and also can only be done on an AppleMac running OS X 10.5.8 or later. I have to admit I find this stipulation very wrong and feel Apple should be forced to drop it by the Monopolies Commission, Competition Commission or any such similarly silly-named organisations in the free world.
You must buy and supply your own ISBN number.
THE END
*Waterstones is book shop a bit like the Barnes and Noble book store.
NOTE: You can buy my digital book, 6x9, for iPad from Blurb here: http://bit.ly/6x9iPad
It is available in hard copy format from both Blurb and CreateSpace – or from Amazon in the US.
Digital printing presses enabled shorter than short print runs – you could now print and order a single copy of your own book for little more than the price of a paperback in Waterstones.*
The first of these new innovators were Lulu, which came to life in 2004. Two years later Blurb emerged. In my experience these two have been by far the cheapest self-publishers, Lulu giving greater versatility, Blurb slightly better quality (certainly in these early days).
I first used the services of both in 2007. From experience I can tell you that converting files to pdfs for printing was not an easy process. In some ways it still is not but the process has improved.
My first and soon to be re-published book, Flashes to Ashes, was designed on Microsoft Publisher (a program never used again) and led to many hours of headaches before I finally cracked the pdf-making process. This included a couple of frantic nights were the converted pdf size was out-putting at 150gb when 150gb hard-drives were like gold dust.
I have to say the quality of printing and cut for full-bleed Lulu books was hugely variable in those days. I was not impressed on numerous occasions and had to have orders reprinted on several occassions.
But soon the printed self-published photo book will be superceded by the digital ephotobook – once the ability to produce digital editions is cracked.
And here we come to the big problem: photo books do not convert digitally anywhere near as easily as novels. The iPad, iPhone, Kindle and eReaders are crying out for photo books.
It was at the beginning of 2010 that Amazon’s digital book sales outstripped its paper versions for the first time. But photo books are conspicuous by their absence in the digital world.
Getting a photo book out there as a digital ephoto book for iPad’s iBook, Kindle (which has a colour Kindle Fire on its way) and Barnes & Noble’s absurdly-named NOOK is, to use my best English accent, a bloody nightmare darling.
So here is my what you can and can’t do digitally with photo books now (November 2011)
Blurb (since October 2011) allow you to produce epub photo books for the iPad and iPhone. This can be done ONLY through their Bookify or BookSmart software
As yet, Blurb can’t convert a pdf into an epub book.
And Blurb do NOT have the facility to sell the book for you on iTunes (although there are plans for this).
When they sort out these two issues, they will be THE place to convert photobooks.
LULU
Lulu are one of several official aggregators for iTunes, meaning you can convert an epub book with them and sell it on iTunes – but this service is not designed for photobooks. Books must be converted from Microsoft Word. Pdfs do not convert.
Other iTunes aggregators are: Ingram, inscribe Digital, LibreDigital and Smashwords. Bookwire is the only Europe-based official aggregator but those of us based in Europe do not have to use them. Which is a good job as their website is written in German.
Lulu supply an ISBN number
DO IT YOUR SELF
You can create your own iPad book but it’s very complicated. And if you don’t have a MAC you can’t create the epub file or (if you don’t have an iPad) test it properly.
There is a great guide here from Blurb.
You must buy and supply your own ISBN number.
CREATESPACE
Amazon’s own self-publishing house allows you to sell directly to their website (the world’s greatest book seller) and around the world through it’s Expanded Distribution Channel.
Their book sizes are really designed for novels only. This means no real choice of paper and they don’t have many book sizes to chose from. If you opt for one of non-industry standard sizes, these books can’t be sold around the world in their Expanded Distribution Channel.
And as an aside, the profit margins for hard copy books sold through their EDC is poor.
CreateSpace supply an ISBN number.
LIGHTNING SOURCE
Perhaps the most non-user friendly application process which involves printing out several pdfs signing them and posting them to the office closest to you (yes, there is one in the UK). Yes, sending applications in the post does still happen. On the plus side, you do get friendly emails sent by real people.
You must buy and supply your own ISBN number.
iTUNES CONNECT
You can submit your own books to iTunes Connect BUT you must pass a stupendous application process.
Just for starters you must have an American IRS tax number. iTunes support and advice in how to do this is appalling.
If you are not resident in the US this means sending a form (I think it’s a W-7 but their website and iTunes own advice is contradictory in places) by post. This process takes two months and includes getting copies of your ID (i.e. passport) signed by US notified officials. You may have to visit your local US Embassy to do this.
You cannot email the IRS or your US Embassy.
Once you’ve got your IRS number you submit to iTunes Connect. Success is at their discretion and also can only be done on an AppleMac running OS X 10.5.8 or later. I have to admit I find this stipulation very wrong and feel Apple should be forced to drop it by the Monopolies Commission, Competition Commission or any such similarly silly-named organisations in the free world.
You must buy and supply your own ISBN number.
THE END
*Waterstones is book shop a bit like the Barnes and Noble book store.
NOTE: You can buy my digital book, 6x9, for iPad from Blurb here: http://bit.ly/6x9iPad
It is available in hard copy format from both Blurb and CreateSpace – or from Amazon in the US.